






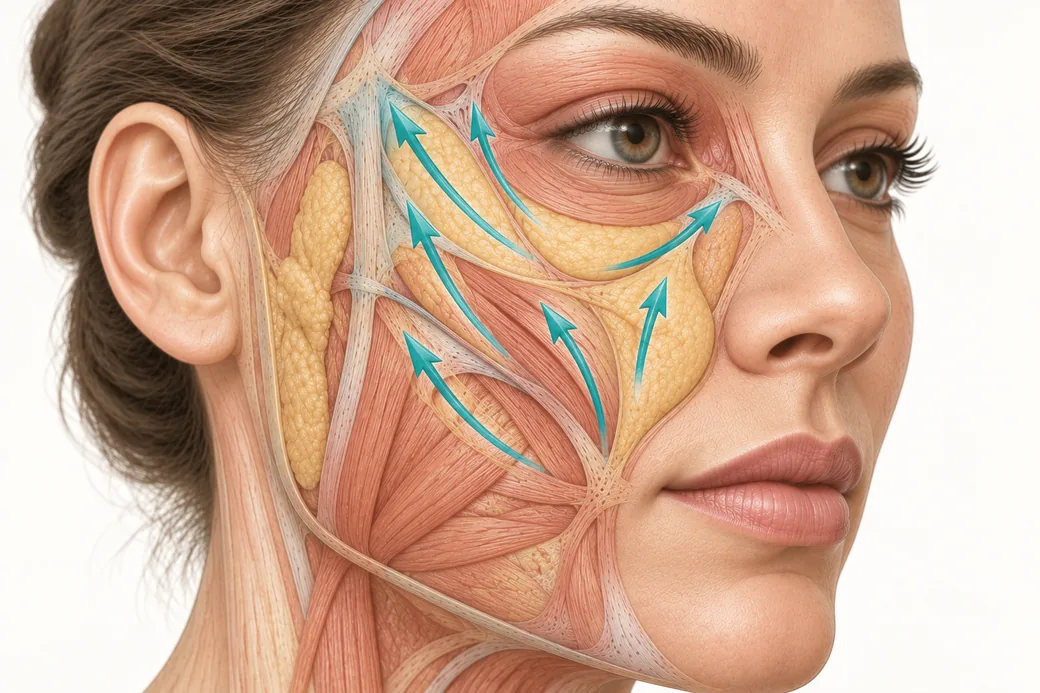
Thread lift vector planning is the part of the procedure that determines the result, and it is finished before the first cannula enters tissue. Two injectors can place identical threads, of identical type, in an identical plane, in the same patient, and produce two completely different faces — because a thread does not lift tissue generically. It moves tissue along its own axis, in one direction, and that direction is a decision the injector makes with a marker.
Tatiana Sarmiento, faculty at Empire Medical Training, teaches the midface as the clearest demonstration of this, because the same entry region supports two legitimate but opposite strategies. One sends the vector toward the oral commissure. The other reverses it toward the temporal area. They are not variations on a technique. They are different treatments with different outcomes, and choosing between them is the clinical work.
These techniques reflect Tatiana Sarmiento's clinical practice as taught in Empire Medical Training's hands-on curriculum. Technique is learned under supervision; this article is educational and is not a substitute for training.
What a vector actually is
A vector, in thread practice, is the line along which force is transmitted into tissue. It has two properties that matter and one that does not.
Direction matters. A cog thread engages tissue along its track and transmits traction along its own axis. Tissue moves along that axis and nowhere else. Force applied at an angle to the tissue's plane of descent produces partial correction plus an unintended lateral or medial displacement — which is where "lifted but the face looks different" comes from.
Origin matters, because the vector's direction is defined relative to where the thread is anchored and engaged. Change the entry region and the same intended direction becomes a different line across the face.
Thread count does not matter in the way injectors assume. Adding threads along a poorly chosen vector adds force to the wrong line. It does not average out into a better result; it commits harder to the wrong one.
The planning question is therefore never "how many threads does this face need." It is "which direction is this tissue asking to be moved, and what is the shortest line that opposes its descent."
Read the descent before you plan the lift
Sarmiento's description of the right midface candidate is, read carefully, a description of vectors rather than of severity. She points at a face and identifies the jawline showing early descent, the midline structures folding slightly downward, and under-eye tissue where "we can see some vectors going down."
That last phrase is the whole method. Descent has a direction, it is visible, and it is patient-specific. The lifting plan is built by opposing it, which means the first diagnostic act is to trace where the tissue has travelled from, not to grade how far it has gone.
Practically:
- Assess the patient upright, in the position the face actually lives in. Supine assessment shows you a face that has already been partly corrected by gravity, and plans drawn on it consistently under-call the required angle.
- Trace the direction of change in each region separately. The midface, the jawline and the periorbital region descend along different lines in the same patient, and a single global vector applied across all three will over-correct one and miss another.
- Reposition manually with a fingertip along candidate directions and watch what happens to the whole face, not the target region. The correct vector improves the target without distorting a neighbour. If lifting the midface along your planned line drags the oral commissure or flattens a contour you wanted to keep, the line is wrong even though the target improved.
Where descent is accompanied by genuine deficit rather than displacement, no vector solves it — that is a volume problem wearing a laxity costume, and vector planning cannot correct for a diagnostic error upstream of it.
The two midface directions
Sarmiento teaches two directions from the midface entry region, and she is explicit that both are available from the same starting point.
Toward the oral commissure
The first direction carries the vector anteriorly and inferiorly, toward the corner of the mouth. This is the vector that addresses descent presenting in the anterior midface and the perioral transition — the tissue that has folded downward and medially.
Its logic is that the thread runs roughly along the line the tissue has travelled, and the engagement then pulls it back along that same line. Correction is directly opposed to descent, which is efficient: the whole of the force does useful work.
Its limitation is elevation. A vector aimed toward the commissure is not aimed upward, so it repositions along the fold without lifting the midface mass significantly higher. For a patient whose complaint is the fold, that is exactly right. For a patient whose complaint is that the cheek has come down, it is an under-treatment that will be assessed as a weak result.
Reverse, toward the temporal area
The second direction inverts the strategy. Sarmiento describes it as "the reverse technique that goes towards the temporal area to give them more elevation of your threads."
Here the vector is carried superolaterally, away from the midface and up toward the temporal region. The purpose is stated in her own terms: more elevation. The force is applied more directly against gravity, so a greater proportion of it produces vertical movement rather than movement along the fold.
This is the choice for the patient whose midface mass has descended as a unit, and the reason it is described as "reverse" is that it runs opposite to the intuitive instinct of pulling toward the problem. The instinct is to aim at the fold you want to fix; the technique aims away from it, and the fold improves as a consequence of the mass moving rather than as a direct target.
The trade is control. A superolateral vector moves more tissue further, which means it also distorts more if the angle is wrong, if the two sides are not matched, or if the tissue was heavier than the plan assumed.
The V configuration
Sarmiento's specific instruction about how multiple midface vectors relate to each other is the most transferable part of her method:
"The vectorisation I want you to do to the patient is towards the temporal area. But keep the vectorisations in a V, the way you can have the maximum lifting effect for your patient."
Threads directed from the entry region diverge rather than run parallel, so that the set describes a V rather than a stripe.
Three reasons this produces more lift than the same number of parallel threads:
It engages a wider tissue footprint. Parallel threads a short distance apart grip overlapping territory. Diverging threads each engage tissue the other does not, so the total amount of tissue under control is larger for the same thread count.
It distributes load. Because the vectors are not collinear, no single line of tissue carries the whole of the correction. This directly reduces the pull-through and entry-point dimpling that occur when force concentrates.
It creates a lifting field rather than a lifting line. A single vector, or a set of parallel ones, produces a visible band of correction with untreated tissue beside it — the classic ridged or striped result. A V spreads the correction laterally as it travels, so the transition to untreated tissue is gradual.
The V also has a natural failure mode, which is the mirror image of its benefit: if the divergence is too wide, the vectors stop reinforcing each other and the correction becomes diffuse. If it is too narrow, you have built parallel threads with extra steps, and you have reintroduced the crowding problem that organised layout exists to prevent.
Constructing the entry point: the method matters more than the mark
Sarmiento does not eyeball the entry point. She constructs it — she draws reference lines across the face from fixed anatomical points, and the entry point is defined by where those lines intersect. The mark is an output of a construction, not a judgement call.
This is the single most exportable idea in her vector teaching, and it survives independently of any particular set of landmarks. A geometrically constructed entry point is:
- Reproducible. The same patient, marked a month later, gets the same point.
- Symmetrical by construction. Both sides are built from the same rule, so asymmetry in the mark reveals asymmetry in the face rather than in your hand.
- Teachable and auditable. You can explain why the point is where it is, and a supervisor can check the construction rather than the outcome.
- Resistant to visual bias. Faces are asymmetric and the eye compensates without permission. A construction does not compensate.
The construction method for the nasolabial vector is treated separately, because it has its own reasoning and its own cautions.
Where the landmarks are learned: the method — construct the point from fixed references rather than estimating it — is what transfers in writing, and it is reproduced here in full. The specific anatomical references Sarmiento uses for the midface entry point are taught where a landmark should be taught: against real tissue, with the marks checked before anything is placed. That is what Empire's Advanced PDO Thread Lift Training and the cadaver-based anatomy programme exist to deliver.
Where vector plans go wrong
Four failures account for most poor midface results in well-selected patients.
Symmetric marks on an asymmetric face. Mirror-image marking looks correct on the drawing and produces asymmetric correction, because the two sides did not descend identically. Construct each side from its own landmarks and accept that the marks will not mirror.
Aiming at the deformity instead of the mass. Pointing the vector at the fold treats the endpoint of the descent rather than the tissue that descended. This is the error the reverse temporal direction exists to correct.
Converging vectors. The opposite of the V. Threads that converge concentrate force onto one line of tissue, producing a puckered focal point and gaining nothing in lift.
Planning the vector after choosing the thread. The sequence is direction first, then the thread that can deliver it. Choosing a thread and then finding somewhere to put it is how a vector plan becomes a placement list.
Regional planning follows the same discipline with different geometry — the submental and jawline application is worth studying as a contrast case, because the descent direction there is more uniform and the vector choices correspondingly narrower. Underlying all of it is anatomical fluency, which is why vector planning is taught downstream of anatomy in Anatomical Based Aesthetics Training rather than as a standalone skill.
Related guides in this cluster
Part of Thread Lifting and Suspension.
 Clinical GuideMono, Screw and Cog — Matching the PDO Thread Family to the Clinical JobPDO thread types explained by mechanism, not by brand. How mono, screw and cog threads differ in what they ask tissue to do — and how t
 Clinical GuideThe Two-Phase PDO Thread Timeline — and the Mid-Course Drop Nobody Warns Patients AboutThe PDO thread lift timeline runs two clocks — suture absorption and collagen response. The gap between them is when patients call disa
 Clinical GuideWho Is Not a Thread Candidate — Patient Selection That Protects Your OutcomesThread lift patient selection by failure mechanism — severe laxity, heavy tissue, crepey skin, fat herniation, and the expectation you
Train with Empire
This guide is clinical education. The technique behind it is taught hands-on, on live patients, with faculty beside you.
Explore PDO Thread Lift Training →Disclaimer
This article reflects the clinical opinions and experience of Tatiana Sarmiento, Faculty, Empire Medical Training, an independent faculty member contributing to Empire Medical Training's curriculum. The views expressed are the author's own and do not necessarily represent those of Empire Medical Training.
It is professional education, not medical advice, and is no substitute for hands-on training or independent clinical judgment. Licensed clinicians remain responsible for their own patient selection, technique and outcomes, for verifying current product labelling, and for practising within their scope and applicable law. Empire Medical Training accepts no liability for reliance on this content.
 Claim Your Prize!